Showing posts with label Decorations. Show all posts

Saturday, October 1, 2011

31 Days of Halloween: Day 1

I do this blog differently every year.  (And not at all on purpose.)  So this year, lets take a look at how I'm spending my October, a.k.a. my 31 days of Halloween.

My day started off by happily stumbling upon the very beginning of Ghostbusters on VH1.  For the past couple years, I've been trying to figure out how I can get my hair that big to be Dana (as Zuul) for Halloween.  After watching the flick this time around, I still haven't figured it out.  Anyway, here's a clip from the film in case I've put you in the mood and you need your fix:


Aside from being appropriate to my comment, I tried to pick a different clip from Ghostbusters that I've yet to feature on this blog.  (Although you can still watch "He Slimed Me" in it's original Halloween Spot post - just another great clip from a great flick!)


After watching Ghostbusters in it's entirety (and losing that portion of the day to be productive,) I unwrapped the new gravestones I bought and placed them outside.  (purchased at Target and Party City)  One "stone" in particular had a job: I was making a grave site this year!


Of course, just like when baking, I never have all the components I need when I start a project.  For the grave site, I also needed some bones and some loose soil.  I made a pit stop at the local Halloween Adventure first, since I haven't visited it yet this season.  It must be said, I was incredibly disappointed!  Their stock was less than impressive, and what they did have was way overpriced.  Oh well!  I knew where I could grab some bones; I had eyed up Target's Bag of Bones on a previous trip.  A little pricey for being styrofoam ($20,) but I needed them to do the job.  Then I ran over to good ol' Home Depot and grabbed the cheapest bag of soil I could.  And I paid for it.  It smelled... unnatural.


Next, I laid out the bones to get an idea of which ones I would use and about where they would go.
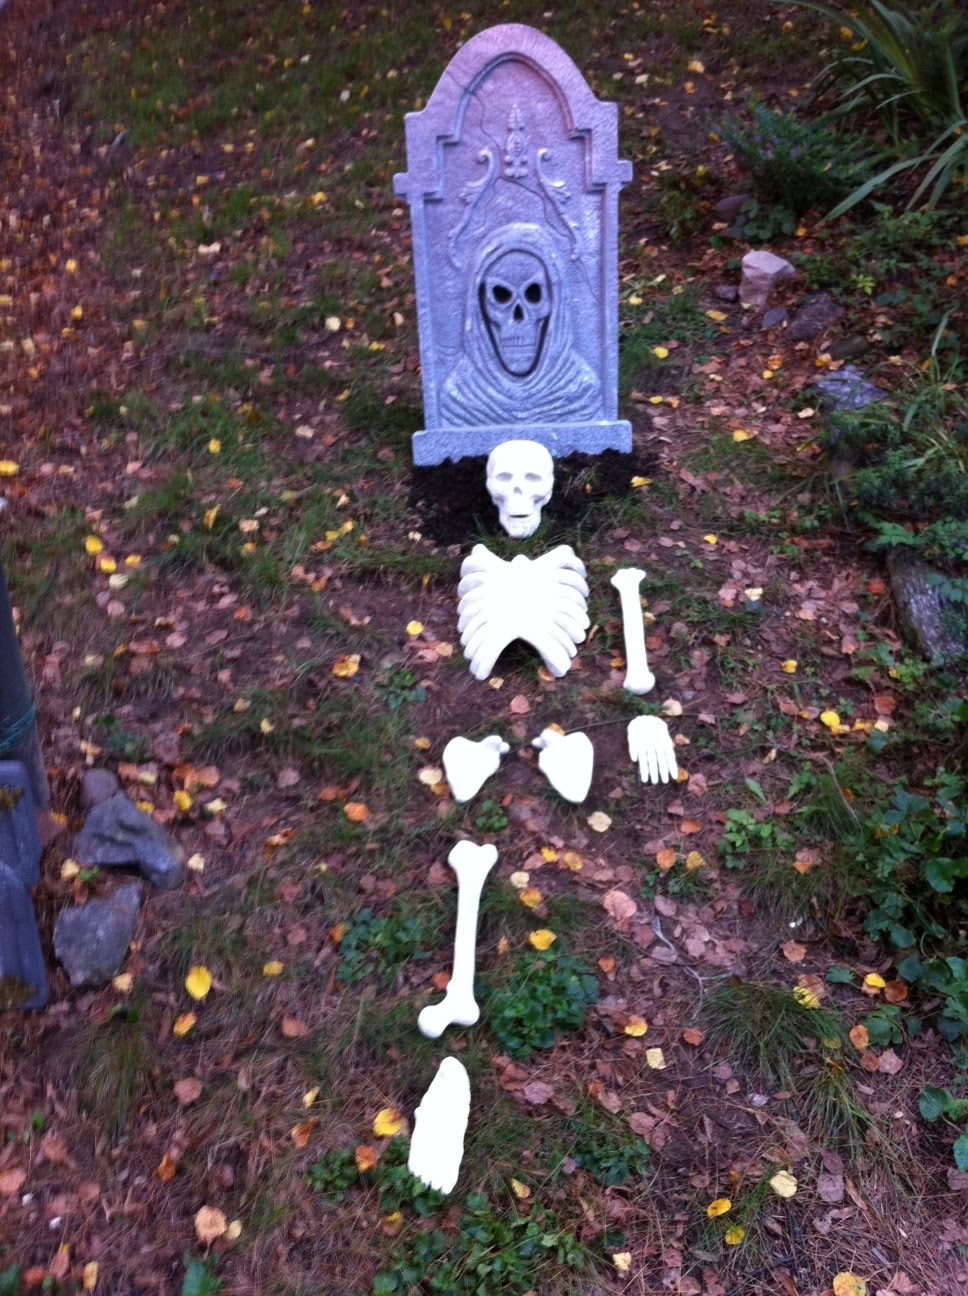


Two reasons I didn't use all the bones in that bag.  1) I thought this would give a better creepy effect, and 2) I now have extras in case any little assholes decide to grave rob.


To lay the soil, I shoveled it bit-by-bit into a bowl to break it up (as it was pretty damp) and to be able to spread it more easily.  This process took a little while, but I thought the outcome was pretty damn good!


I used up the entire bag here, yet some of the ground beneath came through in blades of grass and leaves.  That is A-OKAY.  I plan on spreading another bag of soil over the "grave" closer to the date of our shindig to make it look "fresh."

WHOA!  I missed mentioning an important part of my Autumn-y day!  I had also stopped by Starbucks during my errand-running and grabbed a tasty Pumpkin Spice Frappuccino to make the day more complete :)

photo credit: starbucks.com

Saturday, September 17, 2011

Time to jump in the deep end of the Halloween Season


It's always this time of year when I realize how incredibly behind I am on Halloween preparations.  I spend the summer casually going over past plans and ideas thinking about how far away the season is, then go on family vacation for a week in the middle of September.  And here I am.  There's only *looks at calendar * 44 DAYS UNTIL HALLOWEEN!!  

You may think that's a lot, but ohhoh, no.  Especially when my big party falls on the weekend prior to Halloween weekend.  Now I only have five weeks to get ready!  Complain as I'd like, it's time to really get into now.

So what's there to do before the big day?  Well, the invitations have gone out and RSVPs are beginning to trickle in.  We have our basic menu that we use every year, but I'll need to nail down the themed treats in the next couple of weeks.  Normally this consists of me thinking I can create all these fabulously decorate sweet and savories and maybe two of them actually come into fruition...

Perhaps most timely at this point are the decorations!  Bin after orange-and-black bin will be brought down from the attic this week for me to sort through and distribute about the house and exterior.  Then I'll decide that I need knew decorations - because obviously I don't have enough!  This year is slightly different, though.  I've already decided on a project: a giant, frightening scarecrow!  One that will hide and loom just around the corner for approaching guests.  I already anticipate a lot of blood (both fake and real,) sweat -- I want this thing to be HUGE-- and tears will go into this.  If it doesn't work, I'll cry.  If it works, I'll cry harder.  And maniacally.  

So here's fair warning: I'll (hopefully) be posting throughout this little project of mine.  Be prepared to cringe, to laugh, and even scream - I hope in terror and not in frustration like I do every Sunday at the Eagles.

Sunday, October 17, 2010

Decorations! Just a few for you...


I just put this web up last night.  It definitely looks cooler in person, but it gives you an idea.  The good thing is that we had so much fake web from past years that I didn't have to buy any!  All I did was take clump, attach it to the wall/ceiling via clear push pin/thumb tack, then pull it gently and stretch to another location.  Work on different planes here; if you do the ceiling and then lower on walls and such, you get really great, creepy dimensions in your web.  One of the packs I used had a bunch of little fake bugs already inside.  I just went with it.  That's the black spots you see on the right-side web.  In this picture, you can see only about 1/4 of how much is up in the house.

You can also catch a glimpse of the black lace curtains I mentioned in my other post in the background.


I love this guy.  Every day I hear a kid go by and shout in amazement at him.  They're not fooled but very entertained!  What you'll need: 1 pair of jeans, 1 pair of shoes, fake hands, five plastic grocery bags, and a lot of news paper.  You'll also need means to secure the items to the ground.  No lie, I used old pencils sharpened into stakes.

Take one plastic bag and insert the closed end into one of the ends of the pant legs.  Each bag will act as a different segment of the leg and will also help protect the paper from getting soggy in case it rains.  Stuff the bag with crumpled newspaper; shape if needed.  The end of the bag in the pant-leg should be where the kneed would be.  See in the picture where the legs seem to bend?  Repeat for the other leg.  Then turn the pants around and do the same for each thigh.  Use the fifth bag for the pelvis/ass section.  I tried to give him some nice cheeks.  Still not sure if I succeeded...  Then fix the parts together in your yard as if the person took a dive right into the earth and got stuck! 


This was super easy to do.  All the pieces came in one of the kits that I talked about in an earlier post.  It was very similar to this one:  

I haven't gotten a decent picture of my window scene yet.  My camera just took a crap, so it's in the shop right now.  All of these were taken with my phone.

So let me know what kind of decorating you do for this Halloween!
Send me pictures and I'll post them :)

Thursday, October 7, 2010

Halloween 2010: Update! - Decorations

So far I have the invitations and reminders sent, a mini graveyard constructed, and some gruesome window scenes.  But, I suck at taking pix in a timely fashion.  Look for pictures soon to follow!  In the meantime, here are some of the things I used:

This kit is very similar to the one I used (if not better.)  We got our kit at Party City; I'm not sure how much it was there, but they gave us a 30% off coupon at the register!

On our one large window, we've had an eagle's head (Philadelphia Eagles logo) for a few seasons.  Since Halloween is in the middle of the football season, I didn't want to take it down.  So what I did was take Red Window Paint marker (or similar enough), covered my hands in it, and marked up the window around the bird with some nice, bloody hand smears :)  On a smaller window, I used my red, white, and black window paint markers to create a skull and bones frame with creepy eyes in the middle to watch passers-by.  (I know I sound cornier the more I write...)

As for our big side window, which is the first our guests will pass since our home faces a courtyard, I used the "Chop Shop" theme.  I had fun with this one and I'm not done yet!  I'm still looking for links to some of the products, but I'll post pictures anyway.  On the window, I started with gel window clings of blood spatterings with razor blades.  Yep, you read it.  Then I took Spray Blood Aerosol Paint for Fabric & Rubber to the top (after taping off what I could of the sill, ceiling and sides.)  It created a nice dripping effect, but the consistency was way too thing!  Every dripping ran to the bottom, left more of an orangy-yellow color behind (and marked up my hands pretty good.)  I emailed the company ahead of time to make sure this stuff would come off of windows.  Let's hope they're right...

Then I had invested in a really nice, gory, life-sized head.  It's awesome.  I hung that from the hook in the center of the window [box] we use to hang a wind chime (that gets put up after each plant my mom kills dies...)  I also bought two shrunken heads.  Using white thread and clear pushpins, I hung them on either side of BGH (big gory head.)

Then I threw some black "spooky" fabric on the sill and some 24" Bloody Bandage Decoration.  But I still don't think I'm done.

Other than that, we have these great black scene curtains that my mother bought a few seasons ago.

Slowly, it's all coming together.  But, as always, I'm still looking for suggestions!

Friday, April 16, 2010

Halloween in April: Check out my aStore!

Hey, have you seen my aStore yet?  It's right up at the top.  No, too far.  Just below my logo.  There you go! Go ahead, click on it.  It's actually pretty neat.  I'll admit, I don't have the most of that stuff.  I do, however, want all of it...  I'd start with the punch bowl set.  Yep.

Found a great decoration on Amazon that I don't have in the aStore?  Let me know!  I'll create a page full of just what you guys recommend!  Amazon gave me way too many fun tools to play with...  Love it!

Friday, December 11, 2009

Deck Out Your Fridays! Tree time!

While my emphasis will always be on Halloween, this site is really for me to cover all aspects of Autumn (which includes activities leading up to Christmas!) and holidays in general.  Now I don't know about you, but I just realized how incredibly close Christmas is!!  Yikes!

Last week my family traveled to Linvilla Orchards to cut down our own tree, which is a tradition of ours.  We just brought in into our house today.  Little did we know that our beautiful tree harbored a nest of spiders...  It was like Chamber of Secrets seeing all those spiders on the wall where the tree was propped up against.  I have a strong dislike of tiny spiders.  No don't wear they go!  (<-- I just wanted to keep that sentence for you all so you can see how distracted I am by my own Harry Potter reference.  I can see Deathly Hallows out of the corner of my eye.  When I finish this post, I get to pick it up and continue to reread it!  That sentence should have read, "You don't know where they go!"...)

Anyway, the tree is now in its proper place .  We wait for it to shake itself out so that we can adorn it with our generations of gems.  I can't wait to decorate it tomorrow!  Look out for pictures!

Do you have your tree up yet (if you celebrate)?  Send me pictures!

Friday, December 4, 2009

Deck Out Your Fridays! Wreathes aren't just for Christmas!

Making and hanging wreathes is great for any time of year!

To make your own wreath, start with a wire or foam base, depending on what you plan on adding to it.  Use materials that you find in the season that you'll be hanging the wreath during.  A few ideas to start:

Autumn: Color-turned leaves, nuts and berries, Indian Corn, dried gourds 
Winter: Evergreen base, pine cones, red berries
Spring: Twig base with beginning buds, or Fresh green leaves (for beginning or end of spring), pastels
Summer: Fresh green base, sunflowers, bold-colored flowers

Examples, respectively (Not my own work!):


It's easy to have fun and get creative with wreathes.  If you use natural material, you can recycle the wreath when it wilts, then start new each season.  It saves space and starts a great tradition!

Links:


Friday, November 27, 2009

Deck Out Your Fridays! It's Time.


XmasDecoration.jpg


Now that Thanksgiving has come to pass, it is appropriate to start hanging the Christmas lights and decorations.  I cannot stress just how much it bothers me to see Christmas items for sale at stores BEFORE Halloween has even arrived.  Why don't you just take away from TWO holidays you Commercial Corporate World, you!  And then to see people decorating their homes before Thanksgiving day?  I don't get it.  It frustrates me, being the holiday/Halloween guru that I am.

Enough about me though.  How do you feel about Christmas decorating?

Friday, November 20, 2009

Deck Out Your Fridays! Do you remember...

Of course people still rake their leaves and bag them up, but I'm having a bit of a nostalgic moment here.

As the last leaves are inevitably falling to the ground and Jack Frost is ready to jump in the ring, I can't help but think of the autumns of my past.  It's depressing to say now that I can't remember the last time I jumped in a pile of leaves.  That used to be the best!  The feel, the scent, it's all coming back to me now...

Do you remember the Jack-o'-Lantern bags we used to stuff leaves into?  Then they became a yard decoration until the end of the season.  Why don't I see them anymore?  Is it a thing of the past?  This is what I'm talking about:

(Photo credit: David Beaulieu, About.com)

Did anyone use these this year?  Or did they just disappear...

Friday, November 13, 2009

Deck Out Your Fridays! Autumn Garland

Autumn garland is always so warm and inviting with its rich reds and oranges and completely natural feel  Purchase some now at great discount from your local craft store or make your own!

Here's a great article on eHow to make nature-centered garland:


A fall garland can be made entirely of the beautiful and natural 
things that you find outdoors like crabapples and colorful leaves.
Instructions:


Things You'll Need:

  • Crab apples
  • Cranberries
  • Waluts
  • Silk leaves in fall colors
  • Knitting needle
  • Large bowl
  • Twine
  • Fall-colored ribbon


  1. Step1
    Soak the crab apples and cranberries in a bowl of water for 10 minutes. This will make them easier to thread onto the twine.


  2. Step2
    Use the knitting needle to poke holes in all of your garland components. The needle should be large enough that you will be able to string the crab apples, cranberries, nuts and leaves onto the twine. If this proves difficult, then tie the twine to the knitting needle and string everything like you would beads. As the fruits dry, they will tighten around the twine and will not slide around.


  3. Step3
    String the garland in any order that you like. Some people like to create patterns, while others simple string randomly. Do not put too many leaves too close together as they will bunch up and it will be hard to tell what they are.


  4. Step4
    Fall colors like gold, red and orange make great ribbon accents.


    Fall colors like gold, red and orange make great ribbon accents.
    Tie a large bow on each end of the garland. This will hold everything in place and also will provide a handy way to hang your garland. If you wish, you can also tie smaller bows across the length of the garland.


  5. Step5
    Use an autumn garland as a sweet, natural decoration for your porch or as a centerpiece for a rustic table. You can also run it along the top of a mantle.


Tips & Warnings


  • If you wish to use the garland for more than one season, spray it with a preservative to prevent invading winter guests like mice and squirrels from nibbling on your home decor.


  • You can go all natural or supplement your garland with other items as you wish.


Friday, November 6, 2009

Deck Out Your Fridays! Indian Corn


Indian corn is a great autumn decoration that can be used for Halloween and carried right on over through Thanksgiving.

If you have the resources to do so, I found a neat blog on how to grow your own Indian corn!  However, if that doesn't seem so feasible, Indian corn is usually available throughout autumn, for decoration purposes, at your local farmers markets, craft supply stores, garden centers, and grocery stores.

HGTV's site has a great page all about Indian corn, which offers history, ideas, and other resources.  Some tidbits from the site:

  • leave an ear out in the warm rain and the kernels sprout almost overnight
  • Native Americans saved their largest ears of a crop for seed
  • Calico corn is the result of cross-pollination among a wide range of Native American strains

One of their links at the end of the article is to make "Indian Corn Swag."  They encourage using backyard finds to embellish your corn.  I'm all about using what you have and recycling to make things you'd otherwise throw away.  In this economy, do-it-yourself skills are key.  I have also rather recently gained a strong opposition to "stuff."  

Prepare for a rant.  People today buy far too much crap that doesn't even support our own nation's economy.  Look at what you have, what you can make!  The best gifts anymore are gifts that are made and can be used up.  Gift cards to the movies or restaurants can be enjoyed and take up no space.  Baked goods, which is the way I often go now, show the effort you put into the gift yet don't take up room one they've been gobbled up!  Of course, I'm not opposed to electronics and books... But you get my point ;)

What do you do with your Indian Corn?

Friday, October 30, 2009

Deck Out Your Fridays! Cobwebs

I found this great little article on eHow suggesting a few different options for creating your cobwebs for decorating.  Perfect for that last minute effect to spook your trick-or-treaters!


Things You'll Need:

  • Stretchable cobweb material
  • Plastic spiders
  • Sheer black cloth
  • Cobweb in a can
  • Nylon spider web
  • Cobweb shooter
  • Cobweb spinner
  • Glue sticks
  • Black thread


  1. Step1
    Purchase fake stretchable cobweb material in a bag at a Halloween party store such as Party City. The fake cobwebs resemble oversized thin cotton balls that you can stretch to decorate any item. Put the cobwebs on furniture and add fake plastic spiders to the cobweb for an even more realistic effect.


  1. Step2
    Use creepy cloth in black or grey to create a cobweb effect. The sheer antique-looking fabric gives any item a creepy, old look. Use the cloth as a drape for a table or on a doorway, window or furniture. Add fake cobwebs or more holes to the cloth to intensify the cobweb look.


  2. Step3
    Spray cobwebs onto Halloween decorations using cobweb in a can. This aerosol can of webbing sticks to whatever you spray it on. Use this in conjunction with large cotton or nylon spider webs.


  3. Step4
    Decorate entire rooms in cobwebs in a few minutes using what professionals use, a cobweb spinner or cobweb shooter. A cobweb spinner attaches to an electric drill and sprays out thin filaments of cobweb materials. The cobweb shooter, a modified hot glue gun, uses compressed air to shoot glue to make cobwebs. You can use glow-in-the-dark glue sticks, as well.


  4. Step5
    Create the feel of walking through cobwebs by hanging black thread from tree branches or the ceiling. This method is fun for unsuspecting trick-or-treaters.

I love the idea of the thread hanging from trees.  So unexpected and so funny to watch!  If anyone knows where I can find a cobweb spinner/shooter, let me know!!

Do you have any other tricks or suggestions for the perfect cobweb?